Create your own paperless QC Solution for your lab
2/2/20243 min read


Introduction
Quality control is a crucial aspect of any organization, especially in industries that require compliance with regulatory standards. In the healthcare sector, Clinical Laboratory Improvement Amendments (CLIA) and the College of American Pathologists (CAP) set the guidelines for quality control practices.
In this post, we will discuss how to create a quality control form to ensure CAP compliance. We will focus on the use of paperless quality control forms, which not only streamline the process but also reduce the risk of errors and improve efficiency.
Why Use Paperless Quality Control Forms?
Traditionally, quality control forms were filled out manually, which was time-consuming and prone to human error. With the advancement of technology, organizations can now leverage paperless quality control forms to simplify the process and ensure compliance.
Here are some key benefits of using paperless quality control forms:
Everything in one place: With electronic forms, storing them in the cloud, local drive, or local network is very easy.
Efficiency: Paperless forms eliminate the need for manual data entry, reducing the time and effort required to complete the quality control process.
Accuracy: By using digital forms, you can minimize the risk of errors caused by illegible handwriting or incorrect data entry.
Real-time data: Paperless forms enable instant data capture, allowing you to access and analyze quality control data in real-time.
Steps to Create a Quality Control Form
Now, let's explore the steps involved in creating a quality control form to stay CAP compliant:
Step 1: Identify the Required Fields
The first step is to identify the necessary fields for your quality control form. Consider the specific requirements outlined by CAP and any other relevant regulatory bodies. Common fields may include:
Instrument information
Lot numbers and expiration dates
Instrumentation operating ranges
Reagent details
Ensure that the form captures all the essential information needed for quality control analysis and compliance.
Step 2: Design the Form Layout
For this part, you will need an account with LabQCPro. You can get one here.
Once you have identified the required fields, it's time to design the form. This is a quick tutorial we created for you to explain how a simple form would be created:
By paying attention to these design considerations, you can create a user-friendly form that facilitates accurate data entry.
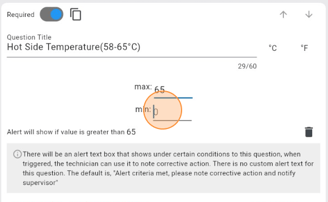
Step 3: Incorporate Validation Rules And Corrective Action
As shown above, LabQCPro has built in corrective action handling on each form. If a temperature or weight is out of range, it will prompt corrective action and alert a supervisor. To ensure data integrity and minimize errors, incorporate validation rules into your quality control form. These rules can include:
Required fields: Mark fields that must be filled out to prevent incomplete submissions.
Data format: Specify the expected format for fields such as dates, numeric values, or specific patterns.
Range checks: Implement range checks to validate values within acceptable limits.
Consistency checks: Cross-validate data between fields to ensure internal consistency.
When a technician fills out the form on any device, LabQCPro will ensure that the data entered into the form is within bounds or has a corrective action attached. This saves your lab money and problems later down the line.
Step 4: Integrate Electronic Signatures
Electronic signatures provide a secure and efficient way to authorize and validate quality control forms. LabQCPro integrates electronic signature capabilities into your forms so you can:
Ensure the authenticity and integrity of the form.
Track and record the identity of the signature on the form.
Facilitate a paperless approval process.
Note: When a form is created by a supervisor, a technician can fill it out. When a form is filled out and submitted by a technician, it is presented to a supervisor as a pdf which can be signed and stored in LabQCPro Cloud or local files on a computer
Step 5: Test and Refine the Form
Before implementing the quality control form, it is essential to thoroughly test it to identify any potential issues or areas for improvement. Conduct testing to ensure that the form meets the needs of your lab and aligns with the CAP compliance requirements.
Collect feedback from the technicians and make necessary refinements to enhance the usability and effectiveness of the form. Iterative testing and refinement will help you create a robust quality control form.
Conclusion
Creating a quality control form to effortlessly stay CAP compliant is a crucial step for organizations in the clinical lab sector. By leveraging paperless quality control forms, you can streamline the process, reduce errors, and improve efficiency, resulting in more savings and time for your business to spend on what matters.